


Two weeks ago I detailed how to build a Hackintosh with Snow Leopard, start to finish, with a little Terminal work. If you’re not comfortable with command-line hacking, now you can install Snow Leopard on your Hackintosh with just a few point-and-clicks.
So what’s changed between my last guide and this one? In short, one of the incredibly helpful and generous people who helped walk me through the installation process last time was kind enough to wrap all the tedious Terminal work into one dead simple installer. Where two weeks ago I showed you how to prepare your thumb drive (and after that, hard drive) with a custom bootloader that allows you to boot into OS X on regular old PC hardware, now all you have to do is run a package, point it at the drive you want to prepare, and then let it take care of all the nitty gritty. It could not be more simple.
Now onto the revised process!
NOTE: Just like the last post, this guide is focused specifically on the hardware I suggested in the previous guide—specifically the motherboard. If you try following this guide on other hardware, there’s a very good chance it won’t work as advertised.
What You’ll Need
- Supported hardware. I laid out my list of supported hardware in my previous post here. It’s not the only hardware that will work with OS X, but it’s the only hardware that’s guaranteed to work with this guide.
- A USB thumb drive that’s at least 8GB in size.
- A copy of the Mac Box Set-though, honestly, Apple’s practically made it hard *not* to buy the fully functional install disc.
- Another Mac to prepare your thumb drive. (You’ll only need this other Mac for a few steps. I used my MacBook Pro, but you could also borrow a friends for an hour or so, too.)
- The EP45UD3P Snow Leopard install package. This package allows you to skip all the command line work in my last guide, and you can download it here.
Step One: Prepare Your Thumb Drive
In this step, you’re going to format your thumb drive and then restore the Snow Leopard DVD image to the thumb drive because later we’ll be installing Snow Leopard to your hard drive using this thumb drive rather than the DVD. Why? Because in order to boot the installer, we need to customise the disk image with some special helper files of our own.
I went into great detail on this process last time, so this time I’m just going to include the step-by-step video below (made by the same generous man who created the EP45UD3P Snow Leopard installer package). If you want to read the very detailed version for a detailed explanation of how to rip the Snow Leopard install DVD to a disk image and then restore that image to your thumb drive, go here. (Come back when you get to the “Semi-heavy Terminal work” warning. That’s when you’re ready for the new and improved easy part.)
Note: Watch the video in HD and fullscreen to get a closer look at everything that’s happening.
As you can see in the video, after you restore the Snow Leopard install DVD to your thumb drive, all you’ve got to do is fire up the EP45UD3P Snow Leopard.pkg file (if you haven’t already downloaded and unzipped it, you can grab it here), select your thumb drive, and, let the installer take care of all the dirty work that you previously had to do one line at a time in Terminal.
Once you’ve finished there, you’re ready to set your BIOS and install Snow Leopard.
Step 2: Set Your BIOS
Before you can boot into or install OS X on your Hackintosh, you’ve got to make some small adjustments to your system BIOS (press Delete at system startup to tweak your BIOS settings). Rather than taking you step by step through every change you need to make, I’ve simply snapped a picture of the relevant BIOS screens and added some notes. Just go to Step 2 here and make sure your BIOS settings match up.
Step 3: Install Snow Leopard
If you’ve made it this far, the hard part is over. Now it’s time to install Snow Leopard, which—unlike what we’ve done so far—is extremely easy.
Make sure you’ve set the boot priority in your BIOS to boot from your thumb drive (you can see how in Step 2: Set Your Hard Disk Boot Priority), then simply plug your prepared thumb drive into your Hackintosh and power it up. Since screenshots aren’t really an option—and since it’s a fairly easy process—my install instructions come in video format:
The quick version goes like this: Boot into the Snow Leopard installer, format the hard drive you want to install Snow Leopard to (go to Utilities -> Disk Utility, then click on the drive, select 1 Partition, Mac OS X Journaled (Case-Sensitive Update: Several readers have suggested that case-sensitive formatting can cause problems with some applications, like Adobe’s Creative Suite, so you may be better off sticking with plain old Mac OS X Journaled.), give it a name, and make sure GUID Partition Table is set in the Options. After you Apply the new partition, go back to the installer and install like normal to that drive. When you reboot after the install completes, press the arrow keys at the graphical boot menu and select the drive you just installed Snow Leopard to.
Two Last Tweaks
You could just stop there and be pretty happy at your new Hackintosh, but there are two little, easily performed tweaks you’ll want to tackle to get everything in tip top shape: The first will get your sound fully working, and the second will allow you to boot into Snow Leopard without your thumb drive.
Tweak One: Snow Leopard should be up and running on your Hackintosh like a dream—with one exception: Sound isn’t entirely working yet. You may notice that sound actually does work in some instances, but not all. In the old guide, you needed to install a custom audio kext (your Mac’s equivalent to a driver); the setup has been slightly tweaked in this new method, so all you should actually need to do is open up the Sound preference pane in System Preferences (/Applications/System Preferences), click the Output tab, and change the output device to Built-in Line output (I haven’t tested with digital out, but it should in theory work fine).
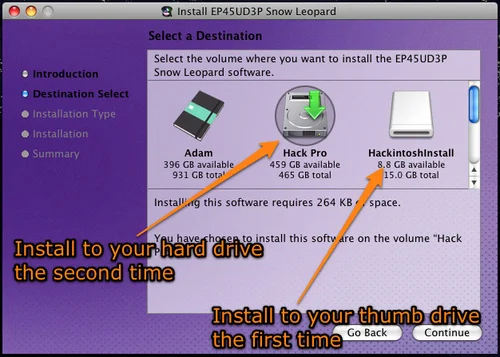
Tweak Two: At this point, in order to boot to your newly installed Snow Leopard installation, you need to have your thumb drive plugged in so it loads the custom bootloader, from which you can select your new Snow Leopard hard drive. To install the custom bootloader to your hard drive (so you no longer need the thumb drive to boot), again download the EP45UD3P Snow Leopard.pkg zip file and run it, but this time, instead of choosing to install the package to your thumb drive, select the hard drive you’ve installed Snow Leopard to. Once the installer completes, you’ll no longer need your thumb drive plugged in to boot into Snow Leopard.
Congratulations! You’ve Got a Fully Functional Hackintosh—the Easy Way
Where the method I covered previously required a good amount of time and care in Terminal, this new and improved method is a breeze, and it works even better. (Sound works out of the box without any custom kexts, for example.)
It’s also worth noting that you can go ahead an upgrade to OS X 10.6.1 without any problems.
If you’ve given the Hackintosh route a try since my first post, let’s hear how it’s been working out for you in the comments. If this extra ease-of-installation was just what the doctor ordered, go grab the parts listed in the last post and get ready for a fun weekend.
[…] IMPORTANT – PLEASE READ THE UPDATED VERSION OF THESE INSTRUCTIONS BEFORE ATTEMPTING TO CREATE … […]
Good job man, thanks a lot – it's my first handmade hamac in my life 🙂
Good job man, thanks a lot – it's my first handmade hamac in my life 🙂