
Note: This article was originally published by Paul Thurrott and received a significant update on October 25, 2009. I now have three methods to try for performing a clean install with Windows 7 Upgrade media.
It was the final unanswered question about Windows 7. But now, thanks to numerous reader reports and my own hands-on experience, I’m can now report that Microsoft is still making it difficult to clean install Windows 7 with Upgrade media. But fear not, there is some good news. While you can’t simply use Upgrade media to do a clean install of Windows 7 on an unused PC with a blank hard drive, the workaround this time is easier than ever. Assuming you know the trick.
Remember how this used to work? In older versions of Windows, Microsoft would actually prompt you to insert an install floppy or CD from a previous Windows version, to prove that you qualified for the upgrade version. But beginning with Windows XP, PC makers were able to dramatically change the Windows install disc, so much so that, in some cases, those discs weren’t even identifiable as valid install media to Windows Setup. Clearly a different system was required.
In Windows Vista, Microsoft supported in-place upgrades from Windows XP, but if you wanted to use an Upgrade version of the Windows Vista Setup disc to do a clean install, you had to perform a weird double install trick. (I documented this process in How to Clean Install Windows Vista with Upgrade Media.)
When it comes to performing a clean install of Windows 7 using Upgrade media, there’s no simple answer. For some people, it just works. Why that is the case will vary from person to person, and while I suspect we’ll eventually understand why, for now all that really matters is that we have a way to make it work for you. So what I’d like to do is provide you with a number of things to try. I assume you just want it to work.
Let’s be clear about what we’re doing here
First up, let’s define what it is I’m describing. For purposes of this discussion, a clean install–or what Microsoft calls a custom install–is when you boot your PC with Windows 7 Setup media (typically a Setup DVD, but with this version it could also be a specially created, bootable USB memory device containing the Setup bits) with the intention of installing just Windows 7 on the PC. There could be a previous version of Windows (XP or Vista) installed on the PC already. You will either install Windows 7 to a separate partition or will wipe out the previous Windows version during Setup. (That is, you will not install Windows 7 on the same partition as your previous Windows version.) If it’s the latter, please–please–be sure to backup all your data first. Please.
A clean install with Upgrade media is just what it sounds like: You will perform a clean install of Windows 7 using an Upgrade version of Windows 7, instead of the so-called (and more expensive) “Full” version. Upgrade versions of Windows 7 are far more common than Full versions, both because they are less expensive and because Microsoft offered (and in some cases is still offering) exceptionally cheap pricing on Upgrade media.
Note: One such special offer, the Windows 7 Family Pack, consists of 32-bit and 64-bit Windows 7 Home Premium Upgrade media Setup discs and a single product key which can be used to activate three copies of the OS on three different PCs. The Family Pack costs $150, or just $30 more than a single copy of Windows 7 Home Premium Upgrade. It’s kind of a no-brainer.
But here’s the paradox. While anyone with a valid, licensed copy of Windows 2000, XP, or Vista qualifies for any Upgrade version of Windows 7–and by the way, that’s pretty much every single PC user on earth–only Vista users can do an in-place upgrade, which is the install type for which Upgrade media is optimized. If you’re an XP user (or, less likely, a Windows 2000 user), there’s no way to do an in-place upgrade. So you have to perform a migration, which consists of three steps:
1. Backup your crucial data and settings using Windows Easy Transfer (it’s on the Windows 7 Setup DVD) and make note of the applications that are installed, because you’ll have to manually reinstall them again after the fact.
2. Perform a clean install of Windows 7 using the Upgrade media. I describe this process in this article.
3. Restore your crucial data and settings using Windows Easy Transfer (part of Windows 7) and then reinstall your applications.
Put simply, there are millions of people out there who will be performing (or, as is too often the case, trying to perform) clean installs with Upgrade media. And for many of these people, inexplicably, it just won’t work. The reasons for these failures, again, seem to vary from PC to PC. But even without understanding the why of these failures, I think we can at least explain how to make it work.
Is this process bulletproof? I’m not sure yet, but I think so. In any event, here’s a checklist of things to try, in order from least painful to most painful. In my limited experience so far, one of these should work for you.
Note: In all of these methods, you should observe one simple rule. Do not enter your product key during Setup. Instead, you will attempt to activate Windows 7 manually after it is installed. So you can just enter your product key later.
Method #1: Just perform a clean install
Many, many readers report that they have been able to simply treat the Windows 7 Upgrade media as if it were Full media, and that it just works. And you know what? It doesn’t hurt to simply try this method, because if it doesn’t work, you can then try methods 2 and then 3, in order, afterwards. There is no downside to trying this.
Here’s what you do. Insert the Windows 7 Upgrade DVD in your PC’s optical disc, reboot the computer, boot off the DVD, and then follow the steps to install Windows 7. If you are installing onto a computer that already has another version of Windows, be sure to back everything up first. Do not attempt to install Windows 7 to the same partition as a previous Windows version. Do not provide your product key during Setup.
After Windows 7 is set up, run Windows Update, download any pending updates, reboot as needed, and repeat until there are no more updates. Then, type activate in Start Menu Search to bring up the Activate Windows utility. Type in your product key and attempt to activate Windows.
If it works, you’re all set. You’re done. Congratulations.
Note: I have now tested this method with the standard Windows 7 Upgrade media as well as with Windows 7 Family Pack media, the latter of which I assume is identical to standard Windows 7 Home Premium Upgrade media.
Here’s what you do want to see.
If this does not work, move on to method 2.
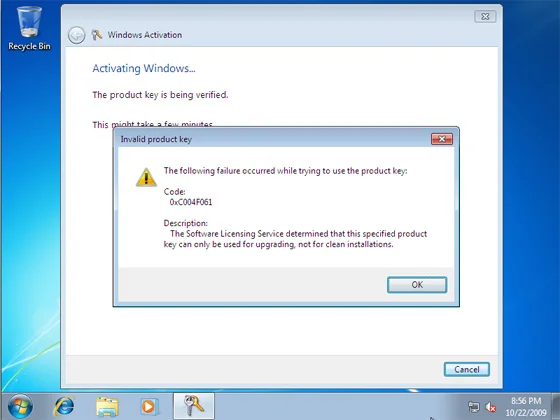
Here’s what you don’t want to see. But don’t worry, we can overcome this.
Method #2: Registry hack
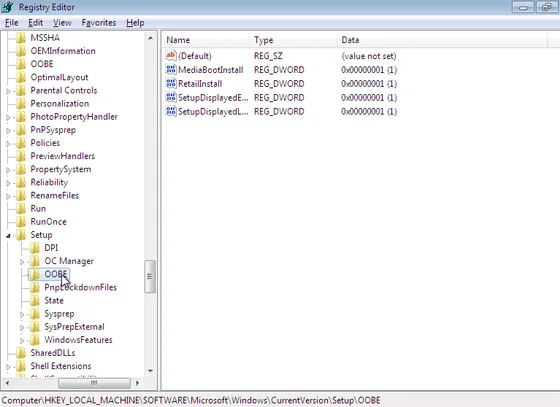
Open regedit.exe with Start Menu Search and navigate to:
HKEY_LOCAL_MACHINE/Software/Microsoft/Windows/CurrentVersion/Setup/OOBE/
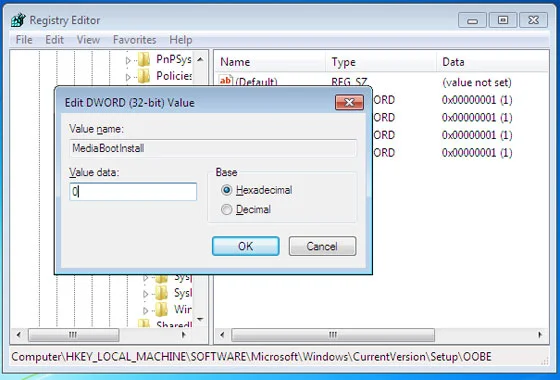
Change MediaBootInstall from “1” to “0”. (Double-click it and then enter 0 in the dialog that appears.)
Close RegEdit.
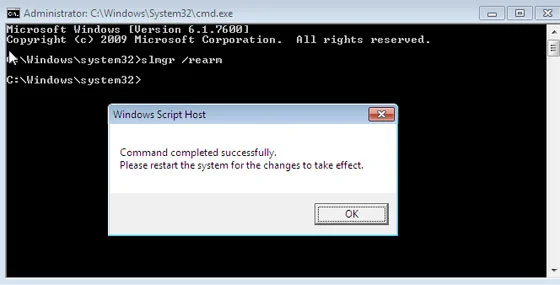
Open the Start Menu again and type cmd in Start Menu search to display a shortcut to the Command Line utility. Right-click this shortcut and choose “Run as administrator.” Handle the UAC prompt.
In the command line window, type: slmgr /rearm
Then tap ENTER and wait for the “Command completed successfully” dialog.
Then, close the command line window and reboot. When Windows 7 reboots, run the Activate Windows utility, type in your product key and activate windows.
If it works, you’re all set. You’re done. Congratulations.
If this does not work, you can try two different things.
First, ensure there are no pending Windows Updates to install. In my experience, some of these can cause this method to fail. Install them and reboot PC. Re-run the command line (with administrative privileges) noted above, reboot again, and re-attempt the activation.
If that does not work, try method 3.
Method #3: The good old “double install” method
If the above two methods fail, you can always fall back on the old “double install” method that I previously documented for Windows Vista. There’s already a whole article dedicated to this topic, but here’s the short version since you’ve already done the initial install:
1. Insert the Windows 7 Setup DVD in the optical drive if it isn’t already there and choose Run Setup from the auto-run dialog that appears. Or, if it is already inserted, navigate to the optical drive in Computer and double-click is icon to trigger Setup.
2. At the appropriate stage of Setup, choose Upgrade (and not Custom). Windows 7 will install as before, though you might notice that it takes quite a bit longer this time. Because you’re upgrading this time, you won’t be prompted to enter your user name or most of the other information that you need to provide during a clean install. Using the user name (and password) you created during the first install, logon to Windows 7.
Now, activation should work. To activate Windows 7 immediately, type activate in Start Menu Search. This brings up the Activate Windows utility. Type in your product key and attempt to activate Windows.
Final thoughts … For now
There are a few other methods for clean installing Windows 7 with Upgrade media. I haven’t tried these yet, but I will, and as I do, I’ll update this article to describe these methods in more detail. But at least one of the methods described above should work for just about anyone.
Please let me know if you have any issues with this or if you discover another method that did work for you.
–Paul Thurrott
October 22-25, 2009
Social comments and analytics for this post…
This post was mentioned on Twitter by kevmarl: How To Do A Clean Install of Windows 7 using an Upgrade Disc http://retwt.me/1tEgH…
Buy:SleepWell.Zetia.Lasix.Wellbutrin SR.Cozaar.Lipothin.Lipitor.Zocor.Benicar.Aricept.Seroquel.Female Cialis.Female Pink Viagra.Buspar.Amoxicillin.Nymphomax.Ventolin.Acomplia.Advair.Prozac….